
Dependency Injection in .NET

Dependency injection is a fundamental design pattern that all .NET developers should know. This pattern helps enhance the scalability and testability of our software and reduces coupling between our components. Before we explain what Dependency Injection is, we need first to talk about the Dependency Inversion Principle (DIP), the design pattern itself and Inversion of Control.
Inversion of Control
Inversion of Control is a broad principle in software engineering where the control flow of a program is inverted compared to traditional procedural programming. Instead of the custom code controlling the flow, control is delegated to a framework or external entity.
Consider a simple application where a class directly instantiates its dependencies. In IoC, instead of the class creating its dependencies, an external source provides them. This approach leads to more flexible and testable code.
IoC, in a nutshell, is about transferring control of object creation and binding from the object itself to an external entity.
What is an IoC Container?
An IoC Container is a framework or tool that manages the creation and lifetime of dependencies. It automates the process of providing required dependencies to classes, simplifying configuration and management.
Responsibilities of an IoC Container:
- Registration: Defining how dependencies should be resolved.
- Resolution: Providing instances of dependencies when needed.
- Lifecycle Management: Managing the lifetime and scope of dependencies (e.g., singleton, transient).
In ASP.NET Core, services are registered using methods like services.AddTransient<>(), and the framework injects them where needed.
The Dependency Inversion Principle
The Dependency Inversion Principle is one of the SOLID principles, and basically, it states that high-level modules should not depend on low-level modules, but instead, they should depend on abstractions, for example, interfaces. Let me give you an example to explain how it works:
public class Car
{
    private readonly ICarEngine _carEngine;

    public Car(ICarEngine carEngine)
    {
        _carEngine = carEngine;
    }
}

public interface ICarEngine
{
    void Start();
}

public class PetrolEngine : ICarEngine
{
    public void Start()
    {

    }
}

public class DieselEngine : ICarEngine
{
    public void Start()
    {

    }
}
We have the Car class, which has an ICarEngine field, and we provide the ICarEngine through the constructor of the Car class. In this example, we do not depend on an implementation of an engine but rather on an abstraction of an engine that can be provided. We can just implement the interface ICarEngine exactly like what you see with the DieselEngine and the PetrolEngine or mock it for testing purposes and work with the Car class.
Dependency Injection
As we already said, Dependency Injection is a design pattern that implements the Dependency Inversion Principle. It involves providing an object's dependencies from the outside rather than creating them within the object. Now, let's see how this can be implemented.
There are three common types of dependency injection:
- Constructor Injection: Dependencies are provided through a class constructor.
- Property Injection: Dependencies are assigned through public properties.
- Method Injection: Dependencies are provided as parameters to methods.
In our Car example above, we saw how the constructor injection works. In the example below, you can see the method injection in a minimal API.
Built-in DI Framework
The .NET framework supports DI through its built-in DI container, as seen in the Microsoft.Extensions.DependencyInjection namespace. Let's a practical example of how to use DI in a web application:
var builder = WebApplication.CreateBuilder(args);
builder.Services.AddScoped<IItemRepository, ItemRepository>();

public interface IItemRepository
{
    void Add(Item item);
}

public class ItemRepository : IItemRepository
{
    public void Add(Item item)
    {
        // Add item to the database
    }
}

public class ItemService
{
    private IItemRepository _dataRepository;

    public ItemService(IItemRepository dataRepository)
    {
        _dataRepository = dataRepository;
    }

    public void ProcessData(Item item)
    {
        _dataRepository.Add(item);
    }
}
As you can see, we can set the lifetime scope of the ItemRepository and how the IITemRepository will be resolved. Also, the ItemService does not depend directly on the ItemRepository, which allows us to mock it for testing.
In addition to the built-in DI container in ASP.NET Core, there are several libraries that enhance the Dependency Injection experience by providing additional functionality and simplifying complex registration scenarios. One popular library is Scrutor, which builds on top of the default .NET Core DI container. Scrutor offers features like assembly scanning, service decoration and automatic registration of services based on naming conventions or interfaces, reducing boilerplate code. For instance, you can use Scrutor to automatically register all implementations of a certain interface within an assembly, making the configuration process more efficient.
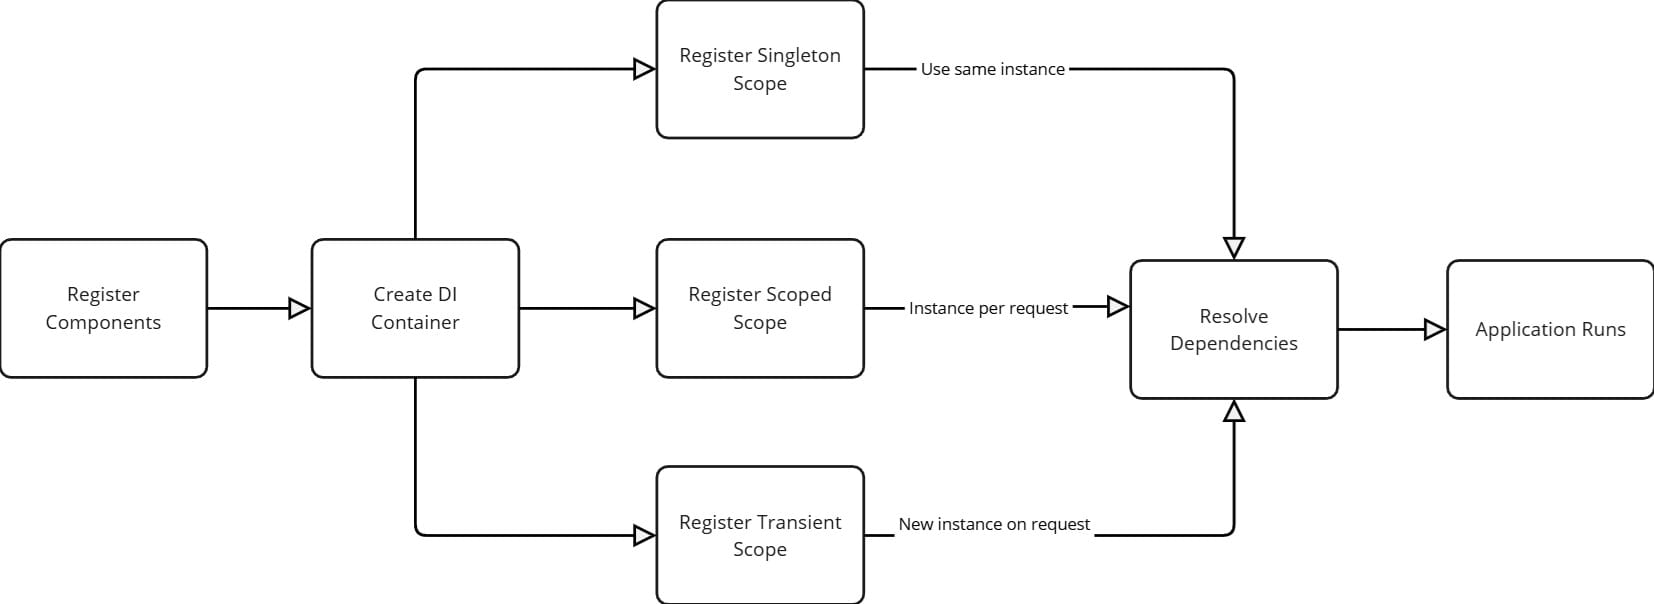
Lifetime Scopes
One of the most critical aspects of dependency injection is managing the lifetime of dependencies. The .NET DI container provides several options:
- Transient: A new instance is provided to every consumer. Every class that needs an instance will get a new one each time for each request.
- Scoped: A new instance is provided per request within the context. Within the context of a single request, the instantiation will happen only once.
- Singleton: A single instance throughout the application lifetime. Best suited for shared resources, such as a configuration provider. The same instance will be used for all requests throughout the lifetime of the application, be careful, not all classes can work as singletons.
Keyed Services
Keyed services extend the built-in DI container by allowing services to be registered with a key. This key acts as an additional descriptor, differentiating between multiple implementations of the same interface or class type. This is particularly useful in scenarios where you need to resolve specific implementations dynamically at runtime. Basically, Keyed services enhance the control that developers have over the resolution of their services.
To get a better understanding of this feature, let's create some code examples:
public interface INotificationService
{
    string Notify(string message);
}

public class SmsNotificationService : INotificationService
{
    public string Notify(string message) => $"SMS message with code 420: {message}";
}

public class EmailNotificationService : INotificationService
{
    public string Notify(string message) => $"Email with code 69: {message}";
}
Now let's register these services to our DI in our program.cs:
var builder = WebApplication.CreateBuilder(args);
builder.Services.AddKeyedSingleton<INotificationService, SmsNotificationService>("sms");
builder.Services.AddKeyedSingleton<INotificationService, EmailNotificationService>("email");
var app = builder.Build();
To resolve each service using keys:
var smsService = app.Services.GetRequiredKeyedService<INotificationService>("sms");
var emailService = app.Services.GetRequiredKeyedService<INotificationService>("email");
To test this, I will create two Minimal API endpoints:
app.MapGet("/notify/sms/{message}", ([FromKeyedServices("sms")] INotificationService smsService, string message) =>
{
    return smsService.Notify(message);
});

app.MapGet("/notify/email/{message}", ([FromKeyedServices("email")] INotificationService emailService, string message) =>
{
    return emailService.Notify(message);
});
As you can see, we resolved the INotificationService based on the key we wanted.
Best Practices/Common Mistakes
- Prefer Interfaces over Concrete Types: Always depend on abstractions rather than concrete implementations to facilitate testing and future changes.
- Understand Dependency Lifetimes: Choose the appropriate lifetime for each service to avoid common issues like unintended sharing or memory leaks.
- Overuse of Injected Dependencies: Inject only what is necessary. Over-injection can lead to code that is hard to understand and maintain. Imagine having a class with 10+ dependencies, is that really maintainable or testable?
- Lifetime Mismatches: Mismatches between lifetimes of services can lead to errors. Ensure that dependencies' lifetimes are compatible. For example, you should not inject a dependency with a scoped lifetime into a component with a singleton lifetime. Doing so does not turn the scoped dependency into a singleton.This leads to incorrect behavior where the scoped dependency behaves like a singleton, which can cause other issues.
Conclusion
Dependency Injection is a really useful pattern to help us write clean and maintanable code. I hope you enjoyed these examples and learned something new. Are you using Dependency Injection? How many times have you been asked about it in interviews? Leave a comment down below and as always, keep coding.
Next steps
If you're interested in taking your knowledge of Dependency Injection in C# a step further, you can always check our "From Zero to Hero: Dependency Injection in .NET" course on Dometrain.


Discussion